
Photographing Windsurfers!
- Dec 12, 2017
- 7 min read

Almost every windsurfer who has a passion for the sport would love to have a photo or two of themselves out on the water, for a lot of us we can’t get enough! Getting a good windsurf photo is not necessarily difficult, however, most windsurfers I have met rarely want to stop and take pictures of each other, if it’s windy they want to go windsurfing! If you can take the time to capture a photo or two of your friends, family or local riders, you will not only make a lot of people very happy, but also get some brownie points and one in the bag for yourself when they hopefully return the favor in one way or another.
As a windsurf photographer I have spent many hours waiting for people to get planing, look forwards instead of at their feet, make their first jumps or even just hold on to the sail long enough to look like they are happily windsurfing when they are having a particularly windy and challenging beginner lesson. I have also spent a lot of time selling photos to people, those who love pictures with them sailing towards the camera although complain about their concentration (a.k.a. windsurf) faces, those who say ‘I had a better sail in the afternoon why didn’t you take pictures then?’, others who definitely do not want to see their face in the photo, people who want a shot taken into the sun because they like the reflection of light on the water even though the colours are poor and they are barely recognisable as a simple silhouette, women who are fast to comment on how their bum looks big in that wetsuit or their hair looks awful because its wet and completely miss their good stance and the beautiful backdrop, and of course don't forget the men who don’t like the fact that their well paid for beer belly is suddenly unavoidably noticeable in their tight wet rash vest and harness.
Aside from the things which you, as a photographer, cannot change, there are a few things you can do to assure you get a happy windsurfer resulting from your efforts behind the lens. Hopefully with some of the following tips and advice it will help you to ensure better results and lots of happy windsurfers.

Equipment
We will start with the equipment, whatever camera kit you have to take a shot with, know how to use it.
•Practice at home, make sure you are confident with focusing the camera on what you want in focus, rather than thinking you have got your subject perfectly focussed and later realising your camera was focussed on something totally different. (I still do this!!)
•Know which modes you have on your camera...whether you want to use Auto or Sports mode, or more manual personalised settings, make sure it’s set on the mode you want and not something else which you don’t understand and may ruin your chance of a good shot.

•Check you have adequate battery and memory, there is nothing worse than walking down the beach to get the perfect angle to find you forgot your card, or your battery is empty after one shot. Ideally I always have a spare of each but if you do not, just ensure your battery is charged up the night before and the memory has been emptied of older photos so you don’t have to start selecting shots to delete whilst on the beach to allow space, when really you want to keep all those funny photos from the party last weekend.
•Keep your camera equipment clean! Windsurfing often will involve sandy, muddy, salty environments as well as the obvious water factor involved in the sport! It’s very important, if you want to maximise the life and performance of your camera, you need to make sure you care for it. Make sure it is clean before you leave the house, make sure your hands are dry and dirt free when using it and keep it stored in a suitable bag, ideally padded and ideally a water proof bag, which will come in very handy to save accidentally placing a wet towel or wetsuit over it on the way home or someone wet dripping on it whilst reaching in the car to grab a quick drink and snack mid-session!
Subject
Next, it really helps to know as much as you can about your subject.
If you are a windsurfer yourself, it should really help you to get a good windsurf photo. From your experience hopefully you will be able to recognise when someone is about to do something which would make a nice photo. You will see when they are unhooking to do a gybe, jump or even freestyle trick. You will know that people are coming in to the beach to the place they like to turn, or that one area of the lake has the best wind for a good blasting shot. You also can see when someone looks comfortable, in a good stance and so when they will look best in the photo (i.e. not taking a shot before they are settled or when they are up-hauling the sail and so on).

If you are not a windsurfer thats no problem, if you know the people you are photographing, ask them what photo they would like, where they will do any gybes (turns) or tricks and suggest they give you a signal if they can. Ask them to windsurf close to you if they are able to, and if you are able to, make them aware that you are there to take pictures so they can really show off, or if they don’t want pictures then maybe they will stay out of the way of others who do want photos! If you do not know them or haven’t spoken with them about the photos, just take some time to watch the action before you switch on the camera, it’s easier to see the whole situation this way than it is looking through your viewfinder. Take some time to see who is doing what and where and so find a good place for you to base yourself and then start snapping away.
Where to shoot from?
You should think about the location, wind directions and where the sunlight is coming from.
Shooting into the sun can result in shots with washed out colours and people will be seen as silhouettes, so seeing their features can be hard. It is also bad for your eyes and the camera. Sometimes you don’t have much choice, and the results can still be pleasing, but generally its better to try to have the sun behind you as you take a shot, so the light is shining onto the subject, making the colours much better in the resulting picture and it should be easier to see the windsurfers features. An easy way to think about this, stand with your back to the sun, the sky will be a lot bluer and colours brighter and more vivid than if you turn to look at things in the direction of the sun, this will be the same in the photo, so the same goes for the colour of everything else.

Thinking about the wind direction, if you sit downwind of the windsurfing action, your photos could result in lots of pictures of sails, blasting by, without being able to see the windsurfer. Sometimes you can get great results of people this way, doing manoeuvres such as gybes, but if you cannot see the person in any of your shots it’s worth trying to sit somewhere else so you can capture the person as well as the equipment. Sitting across the wind can result in great shots of people blasting towards and away from you, sitting upwind you can get some great shots of the subject and their kit, and for advanced photos you can get great speed effects this way too.


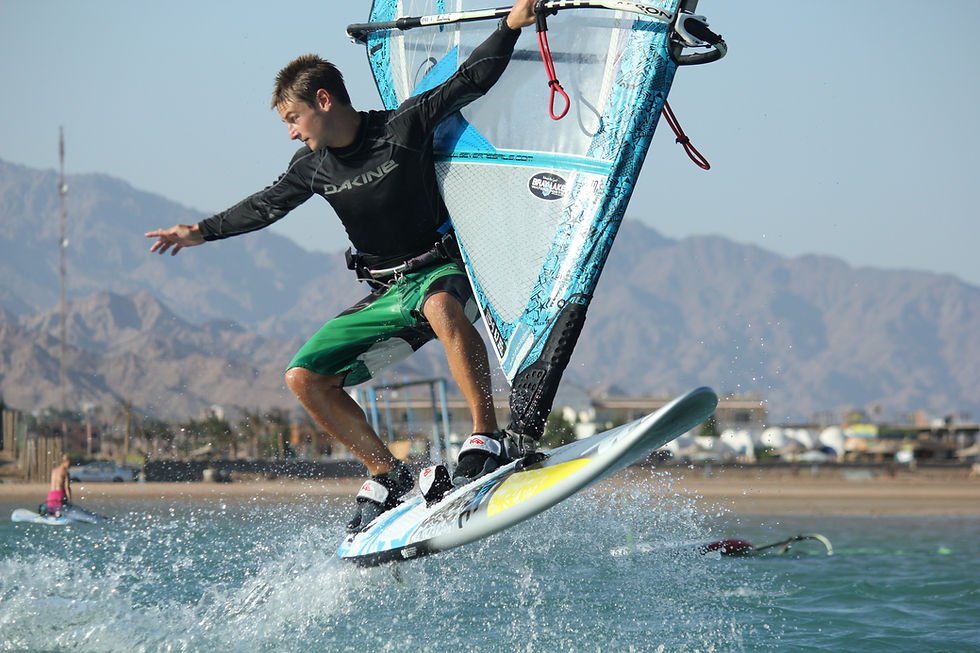
Another thing to think about is the angle you take the photo from compared to the windsurfers...if you sit up high to get some more aerial views of the action this looks great, however if your subject is trying to get jumps and you want to capture a sense of the height of their jump, this will be achieved better from a low level as the distance between them and the water is easier to see...from above you may miss it or make it seem a much lower jump.
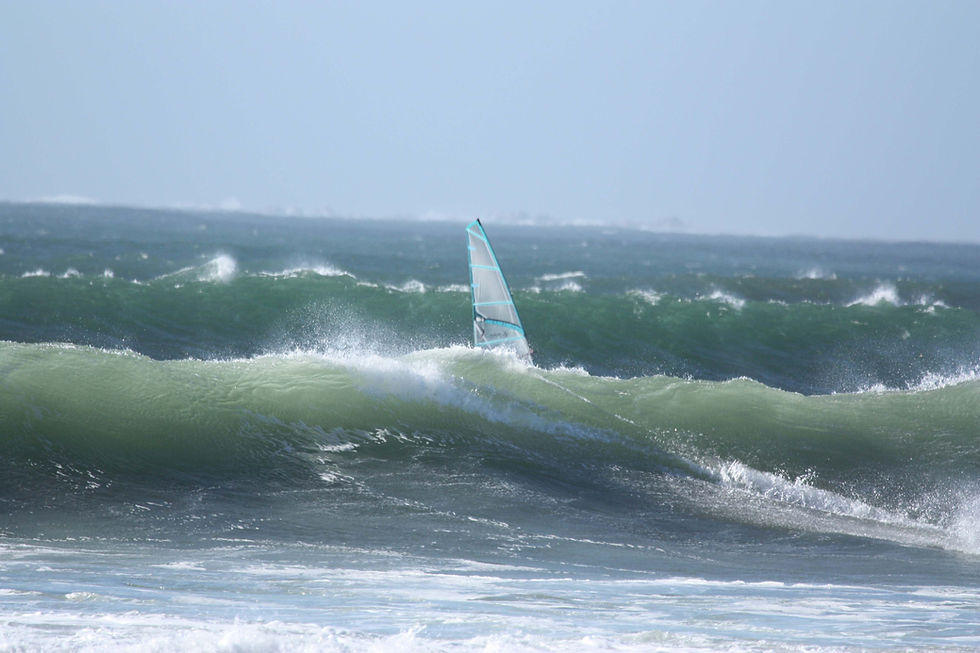
Another reason to think about height would be if you are shooting at a wave location. If you shoot from a low level your sailor may be lost between the waves, the top of the sail may be all you see as they are riding in on their best wave of the day!! Try to find a position where you can see the sailor on the wave, but remember, go too high and a sense of the size of the wave and any height of jumps can be lost so if you can, find a happy medium.
Lastly, don’t be afraid to experiment!

If it’s a quick picture you are after because you want to get on the water yourself, you won’t want to spend much time on this but still, if you are using digital imaging, take a few shots before you rush off to go sailing. This means if the first one is out of focus, or your windsurfer has got his eyes shut, hopefully one of the others will be better!
Try doing landscape and portrait pictures. Dependent on your windsurf spot you can really capture a location by varying the way you hold the camera. Perhaps you have a huge mountainous background with bright blue skies above which a portrait shot would really help to emphasise, or a beautiful long open beach which would make a great landscape background to your windsurfer riding in.
Also think about zooming in and out. If your location is picturesque don’t miss it by zooming in too close to your windsurfer you cannot tell where in the world it was taken. Equally if you have a lot of people on the water, or a less scenic location, you may want to zoom in on the sailor, to cut out distraction from your subject, to hide an ugly background or even just to get the other sailors out of the shot.


Also vary other things such as where you sit to take the picture, the height you are shooting from compared to the windsurfer, as I mentioned before, and if you have a waterproof camera, the distance between you and the windsurfers, if you have the ability to get close, use it!
The best way to get a good shot is to experiment. The more you do the more pleasing your results are, both for you and your subject. Google is a great tool for learning new skills and so once you have got the hang of capturing the action you want, maybe think about going the next stage and learning to set your camera yourself and use less auto options as you improve. Start with one setting at a time and go from there.


Comments